Update: Scaffold now available on Github. NuGet package available here.
Update 2 Concerns over extending controllers are gone thanks to a note by Zurb, Link formatting is also updated to use the ui-sref model. I've updated things accordingly below, as well as the scaffold online.
I’ve been a big fan of Zurb and their frameworks for developing responsive layouts for a while now. I was especially excited when they announced and recently released their Foundation for Apps framework. This new framework is optimized for more speed and leverages the popular AngularJS framework to build apps with. While AngularJS is typically build on a MEAN stack, I wanted to leverage Foundation for Apps (ZFA) in a .Net environment while I rebuild a pet project of mine, and here’s how you can make it happen.
Library Requirements
The first thing to do is to setup all the requirements necessary to run a FA, according to the site, you need make sure you have the following libraries in place:
- Node.js
- Node Package Manager (npm)
- Git
- Ruby
- Ruby bundler package
- Ruby sass package
- Gulp
- Bower
The first 4 items can easily be installed using the chocolatey package manager. It is recommended to install Ruby version 1.9 since version 2 seems to have certificate issues when installing from the command prompt or powershell.
After Ruby has been installed you can run
gem install bundler sass
to get the Ruby packages needed.
Afterwards, run
npm install -g gulp bower
with Administratrive privileges to get the node packages required.
Finally, we install Zurb’s CLI tool by running
npm install -g foundation-cli
which comes in handy for setting up new projects.
Visual Studio Bonuses
While it isn’t required, the new Task Runner Extension for Visual Studio provides a great way to monitor and run various Grunt/Gulp packages within Visual Studio. It helps break out the front end and back end architecture within the app. You will need Visual Studio 2013 or greater, but there is the FREE Visual Studio 2013 Community Edition that is available. Once VS2013 is in place, follow this blog for easy directions how how to get all the extensions in place.
Now on to business!
Install ZFA Base
The default structure for ZFA doesn’t quite match up with what Visual Studio likes for building applications, so we will build our ZFA base and migrate it in.
1. Pick a directory of your choosing and run the following from the command prompt:
foundation-apps new zurb-base
You’ll see the new Yeti in all it’s ASCII glory as it downloads and puts all the basic components in place.
2. Once this is complete, we will want to “compile” our code to setup gulp and put our bower components into place. Run the following commands in order:
npm install bower install bundle
3. Now we can verify everything was downloaded/configured by doing a simple build of the project. Run:
gulp build
This will build all of our code together and put it into a build folder. If you wanted to take right away, you could run `gulp` (with no build command) which would build it and fire up a test server so that you could peek at the project through the URL localhost:8080.
Create WebAPI Project
Since we’re using ZFA for our front end, we’ll tie the backend to a standard .Net WebAPI project so we can leverage it’s REST capabilities and any EF modeling we want to do.
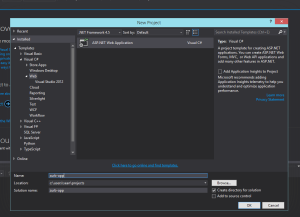
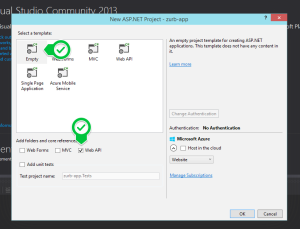
- Start up a new project in Visual Studio. Use the “Empty” project template and check the “WebAPI” option to include the appropriate libraries. We’re calling our app “zurb-app” but you can use whatever you want.
2. Once Visual Studio gets the project started, jump over to your zurb-base folder and copy everthing into the root of your zurb-app project (not solution) except for the “build” folder.
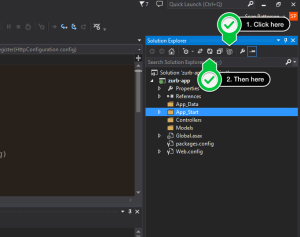
3. Click “view all files” then “refresh” in solution explorer and you’ll see the additional files/folders.
4. Right click and select “include in project” for the following items:
- client folder
- bower.json
- gulpfile.js
- package.json
5. As we mentioned earlier, the default build action in our gulp file assembles all of the resources into a “build” folder, but for our .Net solution, we want these files to be assembled into our project root so that IIS can easily find them. To make this happen, we remove the “build” folder path references from our clean/copy actions. In addition, we add a few extra clean actions (gulp doesn’t seem to like multple rimraf commands in a single task) to properly flush our our assets/templates/etc. upon every build. The updated gulpfile.js looks like this:
6. Once this is complete, right click on the gulpfile.js, select gulp option, and then “build”.
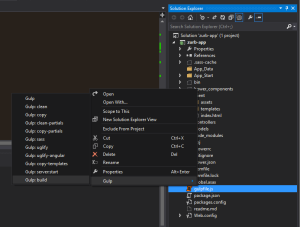
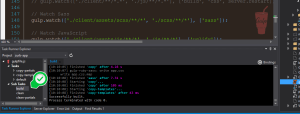
Another option is to right click on the gulpfile.js and select the “Task Runner Explorer” option. This brings up a nice window (that you can dock) with the actions associated with the gulp file. You can then double click the “build” action whenever you need it.
7. After the gulp build completes, refresh the solution explorer and add the following items to the project:
- index.html
- assets folder
- partials folder
- templates folder
8. Now it’s time to see the basics in action. Build and run the project using your old friend CTRL+F5. Hazzah! We have zurb!
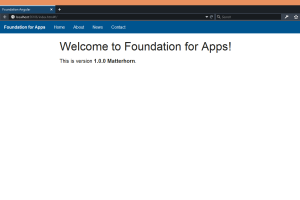
The default items in Zurb is EXTREMELY basic (none of the header links even work), so let’s add a few things to prove things are functional.
Add New Page/View
1. Expand the client folder, right click on the templates folder, and select “Add HTML page” Give it the name “news”.
2. Replace all the existing HTML with the following to create the news view:
--- name: news url: /news --- <h1>Welcome to the News Page!</h1>;
3. Next we update the client/index.html page so that our home and news links are valid angular links (around line 15):
<ul class="primary condense menu-bar">; <li><a><strong>Foundation for Apps</strong></a></li> <li><a>ui-sref="home">Home</a></li> <li><a>ui-sref="about">About</a></li> <li><a href="#!/news">News</a></li> <li><a href="#">Contact</a></li> </ul>
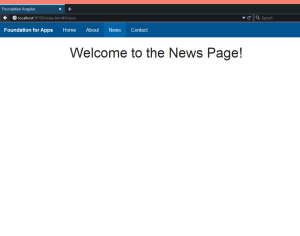
4. Run the gulp build command again to rebuild our assets/templates/etc and index page.
5. Refresh the browser. There’s no need to rebuild the .Net code since none was affected. Click on the news link, we now have a news page! You can click the home link again to go back too. If you don’t see this right away, you might have to hit enter in the URL bar instead of a simple refresh.
Now let’s add some dynamic stuff...
Add WebAPI Method
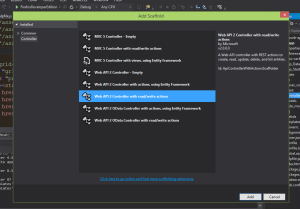
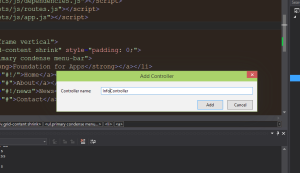
1. Right click on the “Controllers” folder and select “Add Controller” In the scaffold options that come up, select “Web API 2 Controller with read/write actions”. In the next screen, Give it the name “InfoController”.
2. We’ll modify the default Get() method to return a single string instead with the current date/time. WebAPI2 works with JSON by default, so we are all set.
// GET: api/Info
public string Get()
{
    return DateTime.Now.ToShortDateString() + " " + DateTime.Now.ToShortTimeString();
}
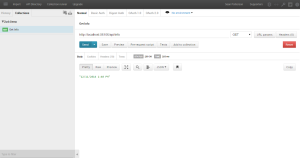
3. Now it’s time to compile the API and verify it’s functionality. I like to use a Chrome tool called PostMan that allows us to easily make REST calls and see our results:
Finally, let's wire up some AJAX fun.
Bind Angular Action to WebAPI
1. First we need to open the assets/templates/news.html and assign a new controller for it, instead of using the default. We also will add a place holder for our timestamp, and a button action to get it. Our file now looks like this:
--- name: news url: /news controller: NewsController --- <h1>Welcome to the News Page!</h1>

<p> Current News Time: <b><span>.</span></b> </p>

<p> <a class="button" ng-click="getTime()">Get News Time</a> </p>
2. Open up the bower_components/foundation-apps/js/controllers.js file (more on this later) and add our controller code at the bottom of the file.
angular.module('application').controller('NewsController', ['$scope', '$stateParams', '$state', '$http', function ($scope, $stateParams, $state, $http)
{
    $scope.newsTime = 'Not retrieved yet.'; $scope.getTime = function ()
    {
        var responsePromise = \$http.get("/api/info");
        responsePromise.success(function (data, status, headers, config) { \$scope.newsTime = data; });
        responsePromise.error(function (data, status, headers, config) { \$scope.newsTime = 'Failed to get time: ' + data; });
    };
}]);
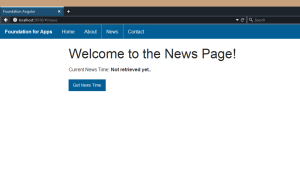
3. Finally, run the gulp build command and refresh the page. Our news page now looks like this:
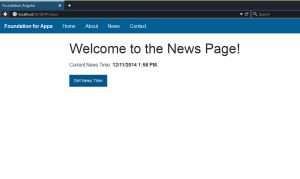
Go ahead and click the button. You’ll get something like this.
There you have it! A fully functional .Net WebAPI application using the new Zurb Foundation for Apps on the front end!
Download
Just in case you want to examine things further, I’ve gone ahead and zipped up a copy of both the base and the app for your convenience. You can download it here.
Improvements
I know that ZFA has only been out for a few days know, but there are a couple of things that could be done for a big improvement:
Watch Task in Gulp - Currently I have to rebuild gulp every time I change my index/template/js files. It would be nice if there was an action to run that would auto watch/build/refresh. I’ve seen this in other projects, so maybe I just need to look it up.
Extending/Configuring Angular - By default, you have an AngularJS application with the name “application”. I can modify this through the bower_components folder, but the next time I update the code base for some ZFA changes, I’m going to lose this. More importantly, I was unable to create my controllers in my client/assets/js folder where I expected to. I tried editing the existing app.js file (which gets merged) as well as my own controllers.js file to no luck. I received errors about a function not existing. I even tried writing my controller code in the template itself with no luck. Maybe I’m missing something in the architecture, but this becomes a bit hassle to overcome as your project expands.
That said, I’m VERY excited at the doors this opens up and I can’t wait to get my project rebased to use ZFA and .Net. If you build any projects using this setup, definitely let me know! I’d love to see it!