So you're setting up a new website, and need to test out your mobile functionality. Sadly you don't have a development server in which you can push everything up to and test that way. Instead, you need to take the "localhost" route. In addition, you do a lot of web development, so you have your websites setup using virtual hosts in Apache. So to get your site, you type in something like "demopyrocms.localhost" to access your individual sites. Here's a breakdown of what you need to do to get everything running smooth.
If you're using a Mac, you'll kick up your iOS simulator, type in your url, and you're all set:

However, if you start up your Android emulator, and try the same thing, you'll get something like this:

The reason for this, is that unlike the iPad / iPhone emulators, which are simply simulated, the Android emulators are truly emulated, so they get their own networking environment. The Android environment does provide a workaround for this. They setup the address 10.0.2.2 as a "redirect" of sorts to localhost on the development machine that you're working on. This works great if you have a single site.
However, as mentioned before, I'm running multiple sites, and I'm using the virtual hosts feature. When you type the address in above, it looks on the device itself, and obviously the website isn't there. The solution is to update the hosts file on the device with a record that has our virtual host address that points to 10.0.2.2. Here's how to make that happen.
1. Starting up the Emulator
The first step is to fire up the virtual machine and give it a little extra space on the SD drive to handle the larger file size. Otherwise you'll get an "out of memory" or different type of error later on. You can't do this through the AVD manager, you have to do it through the command prompt. AVD uses special device IDs for the emulators that you have created. If you don't know the name of your device, you can execute the following command to get a list of them:
./android list avd
And you'll get a listing something like this:

The android program will be in the "tools" directory within your install path. For me it's ~/Applications/android-sdk/tools. Most likely it'll be different for you. Once you know the name of the device you need, you can start it up from the command prompt:
./emulator -avd \[AvdName] -partition-size 128
The emulator program will be in the "tools" directory within your install path. For me it's ~/Applications/android-sdk/tools. Most likely it'll be different for you.
2. Mount the emulator
Once the emulator is up and running, we need to mount it through into the debugger so we can update the hosts file. First we need to get the special id of the device:
./adb devices
The adb program will be in the "platform-tools" directory within your install path. For me it's ~/Applications/android-sdk/platform-tools. Most likely it'll be different for you.
Sometimes the adb manager may be running, but has not properly detected the emulator. To do this you simply need to stop and restart the adb server:
./adb kill-server ./adb start-server
Your device list will look something like this:

Now that you have the ID of the device, you need to mount it to the debugger:
./adb -s \[DeviceID] remount
You'll get a confirmation that the device has been mounted:

3. Update the hosts file
From here, there are two way you can update your hosts file. If one doesn't work, try the other.
Option 1: Pull/Push a copy of the hosts file from the emulator.
Grab a copy of the hosts file from the emulator with the following command:
./adb -s \[DeviceID] pull /etc/hosts \[YourLocalPath]
The [YourLocalPath] value can be anywhere that is easy for you to access. Then edit the file and add the following line:
10.0.2.2 \[YourVirtualHostName]
Then push it back on to the emulator:
./adb -s \[DeviceID] push \[YourLocalPath]/hosts /etc/
It'll look something like this through your command prompt:

Option 2: Edit the hosts file through the ADB shell.
Open up a shell prompt on the device through the following command:
./adb -s \[DeviceID] shell
From there, write the virtual host name directly into the hosts file:
echo '10.0.2.2 \[YourVirtualHostName]' >> /etc/hosts
Then exit out of the shell.
exit
Iti'll look something like this through the command prompt:

Note: After some additional testing, I've found that your emulators will vary as to the location of your hosts file. Some devices like to store it in /system/etc/, some like to store it in /etc/. If one path doesn't work, try the other.
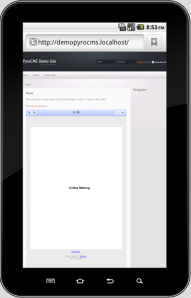
4. Verify the results
Open up the browser and load up the site. You should now be able to see it through the emulator:
There you have it! Now you can do some local testing with your Android emulator. I haven't tried it yet, but I believe if you plug in your Android phone and load it up through ADB, you can do the same thing. I'll try to report back on that a little later.
Hat Tips Galore
I wouldn't be doing right by people if I didn't list the links that helps me piece this all together. There were plenty of sites that had 2 or 3 pieces of the puzzle, but didn't account for an error I ran into, so I'd go to another place. So here's the HT list that helped me out.
- Android Developers ADB Guide
- Restarting ADB Server to see devices
- Pull/Push hosts file on emulator
- Starting emulator through command prompt to increase partition size
- Using shell to modify hosts file directly (comments)
Enjoy!