Sitefinity has a nice forms module baked right into the system. Within a few steps you can easily setup your basic questions, add it to a page, and track the results. You can even get e-mail notifications when a new form item is submitted, should you choose. However, the one downside to the forms module is that out of the box, a from is submitted through your typical .Net PostBack method, and there is no setting to make the form submit via AJAX. Sitefinity boasts about how web service friendly the platform is and that how a lot of modules in the system are already “WCF enabled”. By digging into these, we make our forms submit over a standard REST web service call.
Justification
Why do we need to submit our form via AJAX? In our case there are two reasons. The first is that the design of the form was intended to step the user through a set of questions, instead of having them all laid out on the page initially. Sitefinity forms don’t support this kind of “step” process yet, so we had to roll our own. The second was that when the form questions were answered, we wanted to present the user with a recommendation based on their answers, as well as submit their responses into the database for tracking. Again, this was something not that comes built into the forms module, but was a need for the site.
Please note that in the example below, I’m not demonstrating the “multi-step” or the “recommendation” code. There is plenty of Javascript examples out there on how to accomplish that. Instead, I’m just showing you how to create a form and then submit it via AJAX. So let’s get started.
Create a New Form
We’ll start by creating a simple form. I’ve gone into Sitefinity and created a simple form called “Test Questions.” I added two multiple choice questions: “What is your favorite color?” and “What is your favorite food?”. Once the form was complete, I added it to a test page, and went through it a couple of times so I could generate some responses. You’ll notice that one submission doesn’t have a username attached to it, that is because I made sure to log out to verify the form was accessible.

Analyze Form Elements
Now that we have a form with some answers in place, we can take advantage of the FormsService.svc file that Sitefinity already has in place. You’ll find that if you load up the
/Sitefinity/Services/Forms/FormsService.svc/help
page in your browser, you’ll get a basic definition file of the various actions available in the service, but it isn’t too much help. The best place look in in the admin panel itself. It’s leveraging the WCF services to do basic form interaction. Open up your web browser of choice (I’ve been quite happy with Firefox Developer Edition lately), load up the “Network” inspector, and navigate to the main forms page. You’ll see something like this:
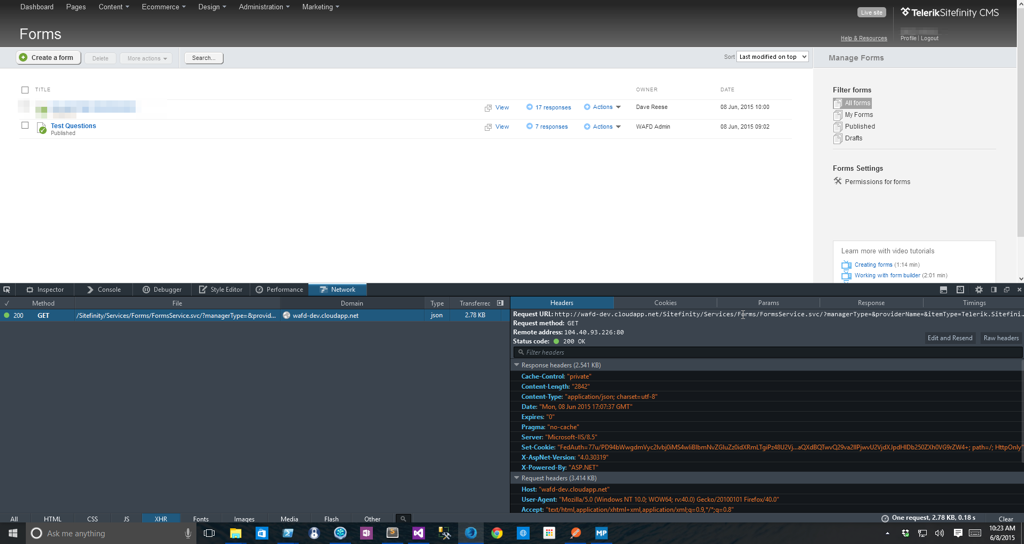
You’ll notice that the URL is rather lengthy. I’ve tried omitting most of the parts of that in the past, but I think due to the backend requirements (OData backend I suspect) we need that all in there. To work with the API requests a little better, I use the PostMan tool. It’s a Chrome standalone tool and is very powerful. We’ll generate a GET request in PostMan and we can look at the results:
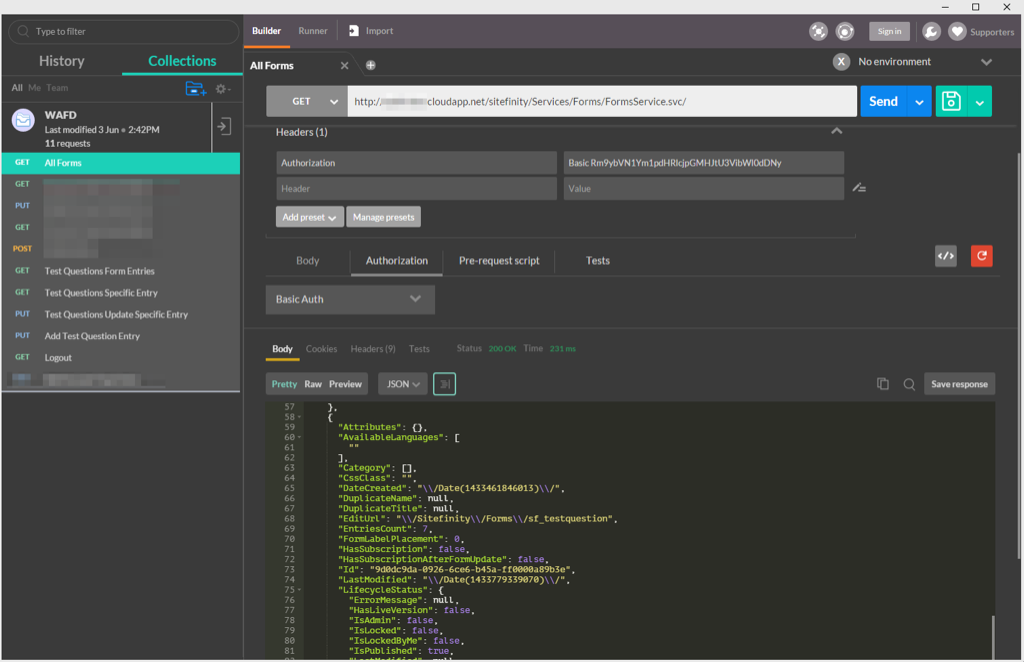
You’ll notice that we have added “Basic Auth” to the request. Some of the REST API methods require authentication to proceed. While we could copy the FormsService.svc file into the public folder in Sitefinity, I decided instead to create a basic FormSubmitter user with limited access to the site and simply encrypt the credentials into the request.
Now that we have the list of forms, we can take the Id of our form and get the list of form entries that we’ve submitted. We’ll use the admin panel as a shortcut again. Click the “entries” link in your list of forms. This will bring up the list of entries, as you’ll see a new (and long) AJAX request in your network inspector. You’re request will look something like this:
/Sitefinity/Services/Forms/FormsService.svc/entries/sf_testquestion/?managerType&providerName&itemType=Telerik.Sitefinity.DynamicTypes.Model.sf_testquestion&provider=OpenAccessDataProvider&sortExpression=Title ASC&skip=0&take=50
While we were able to get away with not having the manager/provider/etc values in the form listing, you will need them to get the listing of form entries. You’re results will look something like this:
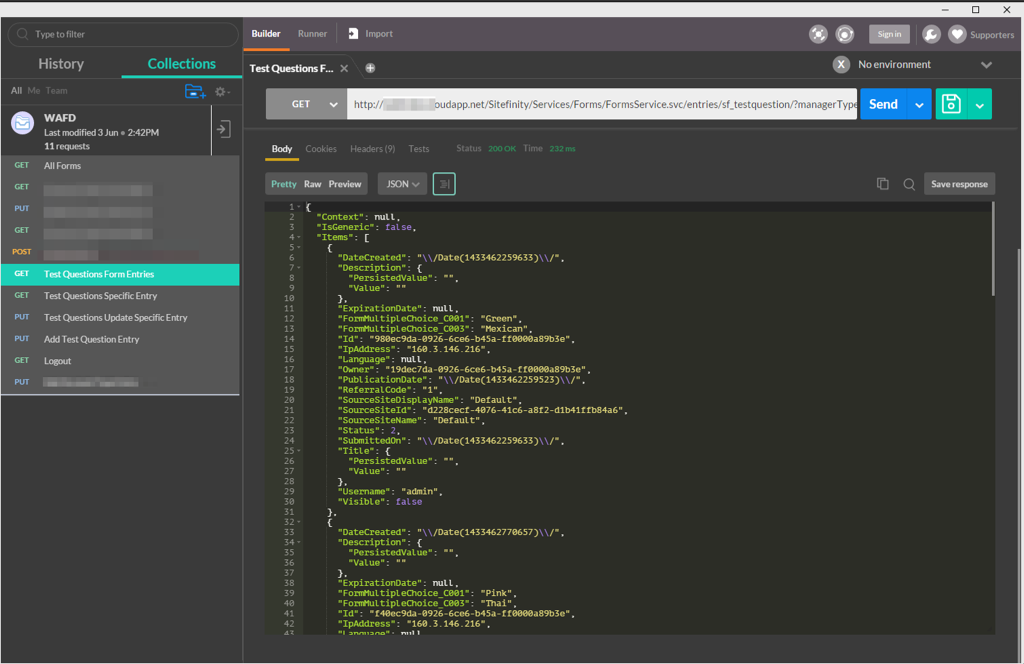
Here you see the structure of each form entry. It’s a lot more complex than the two simple questions we provided when we created the form. You’ll see the two core questions/answers are there under variable names “FormMultipleChoice_C001” and “FormMultipleChoice_C003” variables. You can go back in and make these variable names “friendlier” through the advanced settings if you desire.
While we could piece together URL request needed to submit a new form entry using this information, the complexity of the data and URL structure would have be piecing together things for a while. Fortunately, one thing we can do is to edit one of the given responses in the administrative control panel. Upon clicking the “Save” button you’ll see a new PUT request in your network inspector, and this is exactly what we need. Your URL will look something like this:
/Sitefinity/Services/Forms/FormsService.svc/entry/sf_testquestion/f40ec9da-0926-6ce6-b45a-ff0000a89b3e/?itemType=Telerik.Sitefinity.DynamicTypes.Model.sf_testquestion&providerName&managerType&siteId=d228cecf-4076-41c6-a8f2-d1b41ffb84a6
and your PUT data will look something like this:
{ "Item": { "DateCreated": "\\/Date(1433462770657)\\/", "Description": { "PersistedValue": "", "Value": "" }, "ExpirationDate": null, "FormMultipleChoice_C001": "Pink", "FormMultipleChoice_C003": "Thai", "Id": "f40ec9da-0926-6ce6-b45a-ff0000a89b3e", "IpAddress": "XXX.XXX.XXX.XXX", "Language": null, "Owner": "00000000-0000-0000-0000-000000000000", "PublicationDate": "\\/Date(1433462770643)\\/", "ReferralCode": "2", "SourceSiteDisplayName": "Default", "SourceSiteId": "d228cecf-4076-41c6-a8f2-d1b41ffb84a6", "SourceSiteName": "Default", "Status": 2, "SubmittedOn": "\\/Date(1433462770657)\\/", "Title": { "PersistedValue": "", "Value": "" }, "Username": "", "Visible": false }, "ChangedRelatedData": null, "ItemId": "00000000-0000-0000-0000-000000000000", "AdditionalUrlNames": null, "AdditionalUrlsRedirectToDefault": false, "AllowMultipleUrls": false, "DefaultUrl": null, "ItemType": "Telerik.Sitefinity.DynamicTypes.Model.sf_testquestion", "LastApprovalTrackingRecord": null, "LifecycleStatus": null, "PublicationSettings": null, "VersionInfo": null }Submit a new Form Entry
Now that we have the specific structure we need we can now submit a new form entry into Sitefinity. The trick is that while we don’t have a POST method available through the API, the PUT method actually serves as an “Upsert” type request. This means that if the Id is null, then the underlying service will insert a new record instead of updating an existing one.
Since the API requires most (if not all) of the data elements to be in the request, but seems to ignore most of them for an insert, we can take this existing request and simple make a couple of tweaks. The first is that the URL is changed to:
/Sitefinity/Services/Forms/FormsService.svc/entry/sf_testquestion/00000000-0000-0000-0000-000000000000/?itemType=Telerik.Sitefinity.DynamicTypes.Model.sf_testquestion&providerName&managerType&siteId=d228cecf-4076-41c6-a8f2-d1b41ffb84a6
Notice that our Id field in the URL is now a generic/blank GUID of all 0s. Similarly, we update our PUT data to have the form answers we want, and an empty ID:
{ "Item": { "FormMultipleChoice_C001": "Green", "FormMultipleChoice_C003": "Italian", "Id": "00000000-0000-0000-0000-000000000000", "IpAddress": "", "Language": null, "Owner": "00000000-0000-0000-0000-000000000000", "PublicationDate": "\\/Date(1433462770643)\\/", "ReferralCode": "2", "SourceSiteDisplayName": "Default", "SourceSiteId": "d228cecf-4076-41c6-a8f2-d1b41ffb84a6", "SourceSiteName": "Default", "Status": 2, "SubmittedOn": "\\/Date(1433462770657)\\/", "Title": { "PersistedValue": "", "Value": "" }, "Username": "", "Visible": false }, "ChangedRelatedData": null, "ItemId": "00000000-0000-0000-0000-000000000000", "AdditionalUrlNames": null, "AdditionalUrlsRedirectToDefault": false, "AllowMultipleUrls": false, "DefaultUrl": null, "ItemType": "Telerik.Sitefinity.DynamicTypes.Model.sf_testquestion", "LastApprovalTrackingRecord": null, "LifecycleStatus": null, "PublicationSettings": null, "VersionInfo": null }When you submit this PUT request to the API. The API will note the “empty” GUID and generate a new form request. The response will be a 200 status code and a copy of the new form entry object, with the Id updated to include the new GUID generated. If you go into the admin panel. You’ll see it in the list:

Submit via AJAX
Now that we can verify that we can create a new entry, let’s do it through Javascript. I’m going to cheat here and leverage a nice feature in PostMan that will generate the code for me. Our final result looks something like this:
var data = JSON.stringify({ "Item": { "FormMultipleChoice_C001": "Green", "FormMultipleChoice_C003": "Italian", "Id": "00000000-0000-0000-0000-000000000000", "IpAddress": "160.3.146.216", "Language": null, "Owner": "00000000-0000-0000-0000-000000000000", "PublicationDate": "/Date(1433462770643)/", "ReferralCode": "2", "SourceSiteDisplayName": "Default", "SourceSiteId": "d228cecf-4076-41c6-a8f2-d1b41ffb84a6", "SourceSiteName": "Default", "Status": 2, "SubmittedOn": "/Date(1433462770657)/", "Title": { "PersistedValue": "", "Value": "" }, "Username": "", "Visible": false }, "ChangedRelatedData": null, "ItemId": "00000000-0000-0000-0000-000000000000", "AdditionalUrlNames": null, "AdditionalUrlsRedirectToDefault": false, "AllowMultipleUrls": false, "DefaultUrl": null, "ItemType": "Telerik.Sitefinity.DynamicTypes.Model.sf_testquestion", "LastApprovalTrackingRecord": null, "LifecycleStatus": null, "PublicationSettings": null, "VersionInfo": null });

var settings = { "async": true, "crossDomain": true, "url": "/Sitefinity/Services/Forms/FormsService.svc/entry/sf_testquestion/00000000-0000-0000-0000-000000000000/?itemType=Telerik.Sitefinity.DynamicTypes.Model.sf_testquestion&providerName=&managerType=&siteId=d228cecf-4076-41c6-a8f2-d1b41ffb84a6", "method": "PUT", "headers": { "content-type": "application/json", "authorization": "Basic Rm9ybVN1Ym1pdHRlcjpGMHJtU3VibWl0dDNy" }, "processData": false, "data": data };

$.ajax(settings).done(function () { console.log('Form submit complete.'); });
You can refine this as needed.
Developers Note
At this time, this isn’t what you would call the most elegant solution in the world. There are a lot of “extra” data that has to go into your request and we’re leveraging an “upsert” type command that may or may not have been the original intent of the platform. That said, the solution does work and I’ve made my thoughts known about exposing a more standard POST method to this.
Be Fruitful and Codify!
So there you have it. A way to create forms in Sitefinity and submit new entries to them over a standard REST API request using AJAX. Another alternative would be to code up your own WCF service and leverage the backend libraries to access forms, but I wonder if the same level of complexity would be involved. Sitefinity divs, I’d love to know, or if you have any other recommended approaches to take.