Note: I just upgraded to OSX Mavericks (10.9) and the ReadyShare drive is still readable and functional in Time Machine. You shouldn't run into any trouble if you decide to upgrade. If you do run into problems (I did later on), I have some notes below to help.
Over the weekend I purchased a Netgear DGND3700v2 DSL Modem / Router (N600) and discovered that there was a great feature called ReadyShare. This allowed you to plug a USB drive into it and have it shared across all your computers in the network (music, photos, backup, etc.) However, their documentation to get it to work with OSX's Time Machine backup tool wasn't working. After some digging and tweaking, I managed to make it work.
TL;DR (For those of you that want the quick fix);
Use Fat32 (might be listed as simply FAT in newer versions of Disk Utility) partitions for all your partitions since the router will be able to read them. From there, create a sparse bundled disc image on the partition for your Time Machine backup. Mount it, and then set that to be your Time Machine backup source.
The Setup
I'm running a MacBookPro with Mountain Lion (OSX 10.8.3). I have a Netgear DGND3700v2 DSL Modem / Router (N600) with firmware version 1.1.00.12_1.00.12NA and a Western Digital Elements 1.5 TB Drive. Getting things to work for you may vary slightly based on drive/hardware, but I this approach should work.
Formatting the Drive
The first step is to format the drive. According to the documentation, the router is supposed to be able to support OSX Extented (Journaled) partitions, but I could never get them to show up. According to some various discussion threads, the AFP protocol changed somewhere in Lion and there's still no support since Netgear does some custom interaction with the shares. However, ReadyShare DOES support Fat32 and we can make this work on OSX.
The first step is to plug in your USB drive and backup any data you may want to keep on your USB drive. We have to repartition the drive, and you'll lose everything. Next launch the Disk Utility tool, select the USB drive, and click the "Partition" tab.
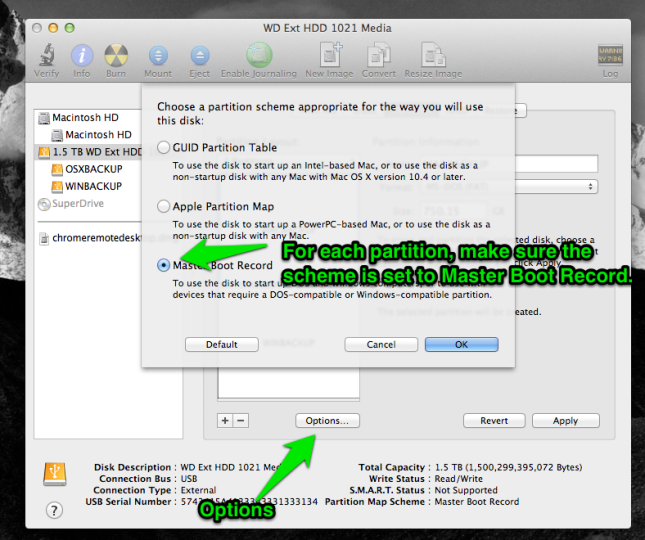
Change the drop down from "Current" to whatever partition scheme you want (I'm using two). Change the drive formats to be "MS-DOS (Fat32)" and verify that they are being created using the "Master Boot Record" scheme (under options). Note, that with El Capitan the option now simply reads MS-DOS (Fat). Major HT to James B and Jon for helping debug this one in the comments.
One other important note, and this comes from Fernando who commented below:
One very important thing I did not see in the instructions is to make sure the backup image has the option to “Ignore ownership on this volume” set to OFF or unchecked. Apple warns that using Time Machine on a disk with the option turned on can result in the backups missing some user settings. My guess is that the average person is likely to go on without noticing this until it is too late. (!!)
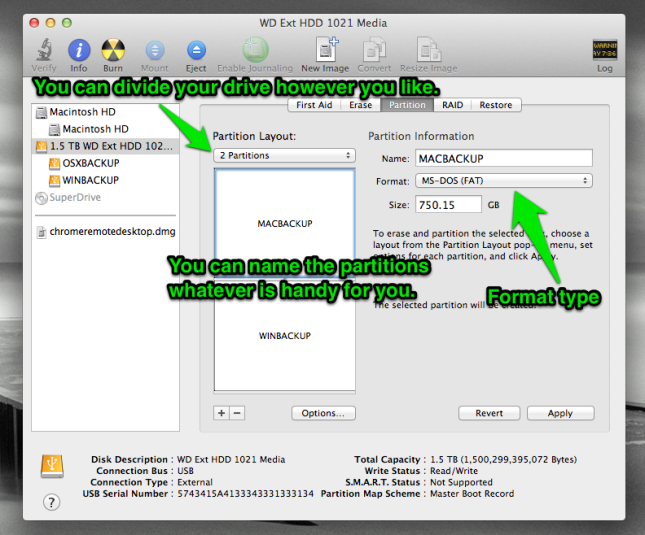
Once your options are set. Click the "Apply" button to repartition the drive. This make take a little time based on the size of the drive.
Creating the Time Machine Image
Time Machine requires an OSX Extended (Journaled) partition in order to function properly. While we don't have a drive in this format, I discovered (immense HT to Frank over in the Netgear forums) that we can create a disk image in this format and have Time Machine backup on to that.
Close the Disk Utility program and open it back up again. Click the "New Image" icon. In the window that opens up to specify where to save the image to, make sure you specify the proper partition again. You can name the image whatever you want. In addition, we want our disk image to have the following settings:
- Name: Whatever you prefer. I call mine "TimeMachine" for consistency.
- Size: Whatever fits best on your system. I use the "Custom" option and make it close to my full drive space.
- Format: Mac OSX Extended (Journaled)
- Encryption: Whatever you prefer
- Partitions: Single Partition - Apple Partition Map
- Image Format: sparse bundle disk image
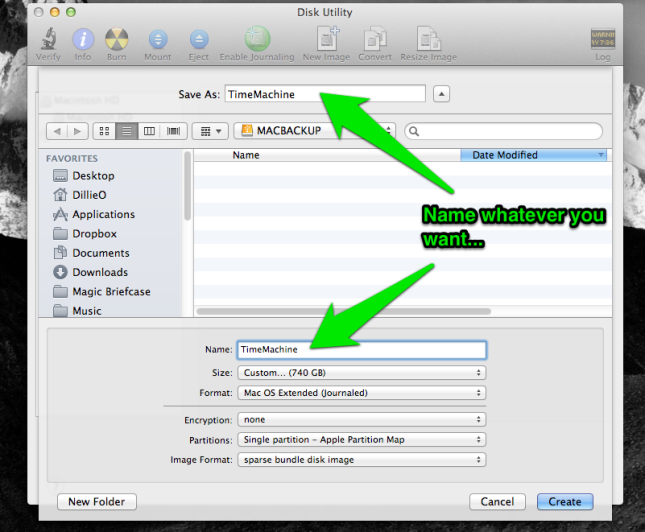
Once all the settings are in place, click the "Create" button and wait for the process to finish.
Now you can eject your drive and plug it into the router to finish off the process.
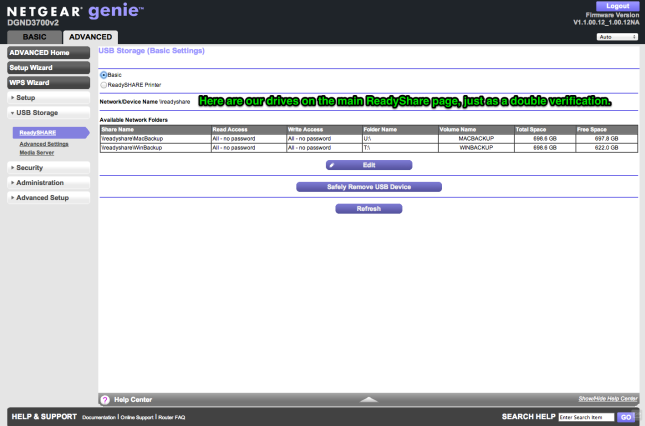
Verify ReadyShare Drives
After plugging in the drive to your router. Launch the router admin tool (http://routerlogin.net), select the "Advanced" tab, expand the "USB Storage" section, and click the "Advanced Settings" link.
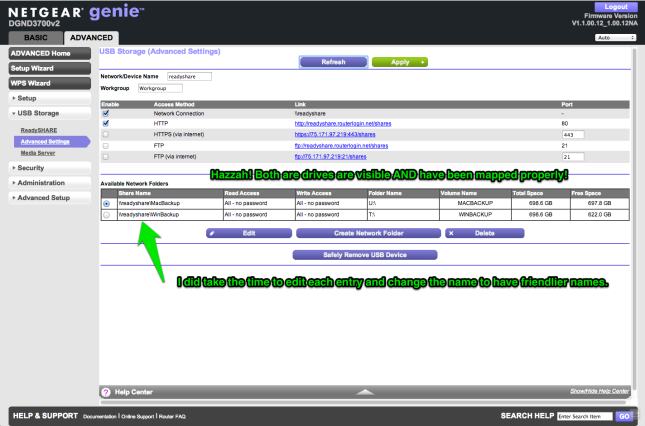
From here we want to verify that we can see both of our drives listed. If not, you can use the "Create Network Folder" option and add the necessary folders.
Our final step is to map up Time Machine.
Mapping Time Machine Backup Location
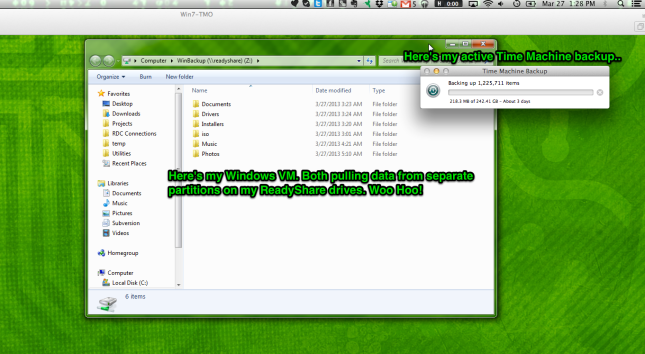
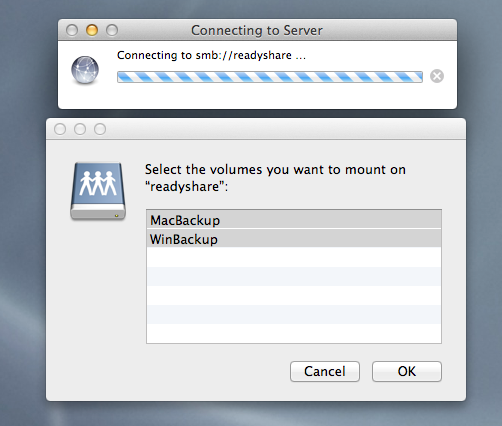
Now that we have our drives available in ReadyShare, we need to connect them to the server and setup our mappings. From Finder, select Go -> Connect to Server and enter the address smb://readyshare and click "Connect". After connecting, select the drive your Time Machine image is on (or both in my case since I'm sharing music on my WinBackup drive) and click connect.
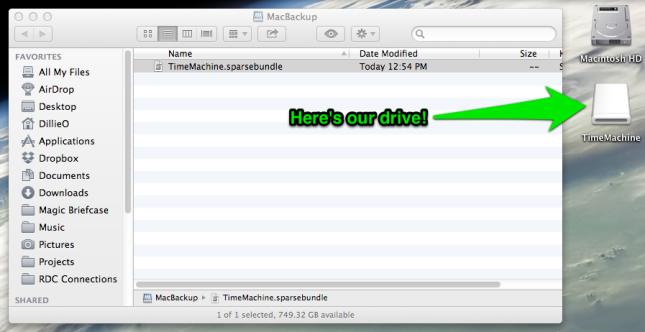
By default, your Time Machine image will not have been mounted. We need to do this. Open up the drive that your Time Machine partition is on and double click on the .sparsebundle file that is there. After a minute you will see that your image has been mounted
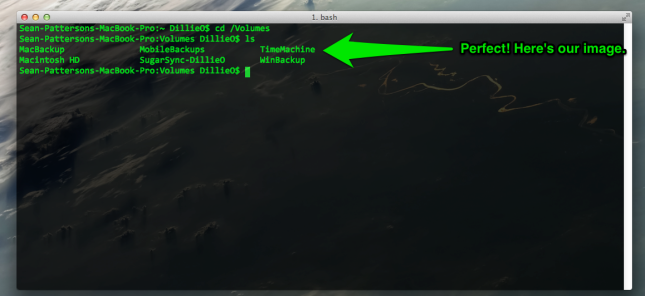
Finally, we need to select this image for our Time Machine backups. We do this through the Terminal window. Open up a new terminal, and enter the following commands:
cd /Volumes ls
If all is still working smoothly, you'll see your Time Machine image listed
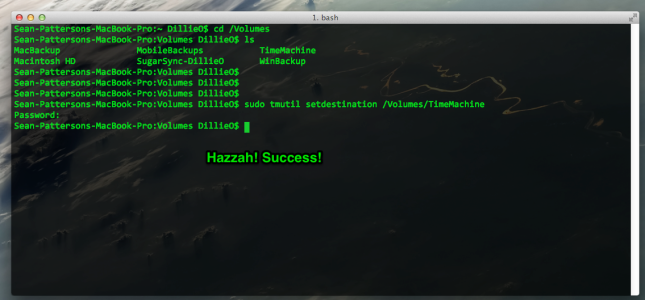
Now enter the command (we need to do this as room) to do our mapping
sudo tmutil setdestination /Volumes/
Note: If you're using OSX 10.7 (Lion) the command appears to be:
sudo tmutil setdestination -p /Volumes/
Note: If you're using OSX 10.6 (Snow Leopard) and below the process seems to be a lot trickier. The best documentation I've been able to find to date is this one. Please let me know if you find better.
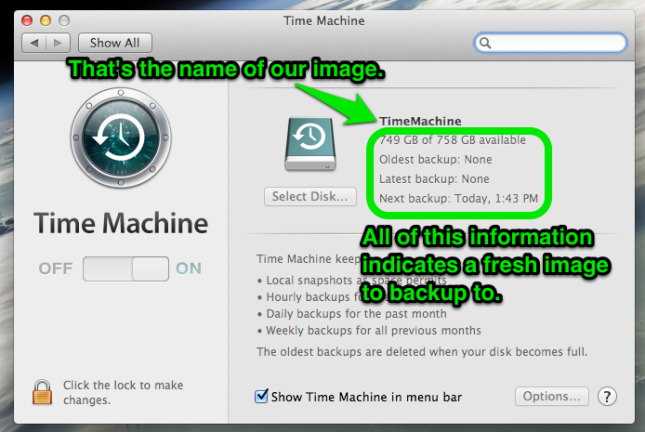
If there's no errors, you have success! You can even verify things in Time Machine itself.
And you're all set! Now you can run your Time Machine backups and leave your drive on the network. I find this particularly helpful since sometimes I'm working upstairs or down in my office, and don't want to drag the USB drive with me. Plus I can share the MP3 collection across my virtual machines and other Windows machines in the house.
Mavericks: Dancing the Samba
A while after I updated to Mavericks (10.9) I had to do a complete reformat of my machine. After doing so, I wasn't able to connect to my readyshare drives, though I could still connect to them through my Windows virtual machines. I would usually get a timeout message, or I would be prompted for a username and password, and then after a delay there was an error connecting. Doing some research, this issue is due to the fact that with Mavericks, the new default protocol for Samba connections is SMB2, while most systems (including ReadyShare) is using SMB1. To fix this issue, there are several options which might work:
- Instead of using smb:// when connecting, use afp:// (HT to Tim Nordyke for this)
- Instead of using smb:// when connecting, use cifs:// (HT to this article for this)
- Override the defaults so that SMB connects using SMB1 protocol (HT to this article for this)
- Create a new Network Folder in the ReadyShare administration panel that points to the same drive. For some reason the old network folder just wasn't connecting, but a new one did just fine.
For me, a combination of the last two did the trick, but I've seen lots of success with the first two as well.
Final Notes
You'll want to do make sure that your drives/images are remounted upon login to make sure Time Machine continues to function. To do this, read this followup post, since it was a little more involved than I initially thought.
I've been told that you can use EXT 2 formatted drives and they play really nice with the router, but you're going to need something like MacFUSE installed to properly handle the drive.
You could potentially use your Windows partitions in NTFS by reformatting them again on a Windows machine, but I'm not going to risk it for the time being. 8^D
A HUGE thanks to all the people that have commented below and have helped diagnose issues as each new version of OSX comes out. It's great to have a "living document" in this manner.
Hope this helps!