Note: A lot of this is a duplicate of my original post outlining ELMAH. However, with the advances of MVC and Nuget package management, I felt a new tutorial was in order. Enjoy!
Synopsis
Elmah (Error Logging Modules and Handlers) provides an excellent way for you to get a basic logging mechanism into your web application in minutes. One of the beautiful things about Elmah is that it exists as it’s own module, so you can integrate it into an existing web application without having to do anything invasive to your existing code. Elmah gives you detailed information about each exception it logs, including a “snapshot” of the “yellow page of death” that was generated for further examination.
Application logging is a great way to debug and maintain your application for its entire lifecycle. While there are numerous logging frameworks out there these days, Elmah . This article will give you a basic overview of the library and how you can integrate it into your projects quickly and easily.
The Fundamentals
You can download Elmah from their site in two forms, the binaries or the full source code. If you’re looking to simply use Elmah, simply download the binaries directly into your project using Nuget. Elmah allows you to log the exceptions into the following formats:
- Microsoft SQL Server
- Oracle (OracleErrorLog)
- SQLite (version 3) database file
- Microsoft Access (AccessErrorLog)
- VistaDB
- Loose XML files
- RAM (in-memory)
- SQL Server Compact Edition (arrives with version 1.2)
- MySQL (arrives with version 1.2)
- PostreSQL (arrives with version 1.2)
Elmah can be used with any version of the .Net Framework from 1.1 and above and will run under medium trust using version 2.0 and above, which enables you to use Elmah on most hosted sites. This is a big help since a some logging frameworks require full trust in order to function properly.
Configuring Your Logging Environment
For purposes of this article, we’re going to configure logging to use SQLite to log our exceptions. Using SQLite provides a nice database of our logs that we can access through third party tools if necessary, and helps keep the file size down, as opposed to using an XML file. In addition, not logging to SQL Server allows us to log database errors that otherwise might not get logged.
Fortunately, the Nuget package manager (now built into Visual Studio 2012 and easily added to Visual Studio 2010) handles most of the installation woes for us. It also allows us to easily update or uninstall the package if we decide to not use it.
The first step is to install the Elmah and SQLite packages. Simply enter the following commands at at the package manager command prompt (available through View -> Other Windows in Visual Studio if you can't see it already.)
install-package elmah

install-package System.Data.SQLite
After the packages have been installed, you'll notice that you already have the references to the proper binaries in your project AND your web.config has been setup for you. All we have left is to make a couple of modifications to the web.config file.
The first step is to add a connection string pointing to the physical file where the log database will be saved. I've become partial to having a "Logs" folder in my projects, so you can see the connection string as follows:
Note: In all of the web.config snippets below, if there already exists the proper tag for a given element (configSections, httpModules, etc.) don’t add them a second time, simply add your tag into the existing section.
Then in our elmah configuration section, we go ahead and update the configuration to allow remote access to the file (so we don't have to VPN into the machine) and define the log type:
For consistency, we update our location settings right below the elmah configuration section to match the path (only snippets are shown below):
<add verb="POST,GET,HEAD" path="Logs/elmah.axd" type="Elmah.ErrorLogPageFactory, Elmah" />

<add name="Elmah" path="Logs/elmah.axd" verb="POST,GET,HEAD" type="Elmah.ErrorLogPageFactory, Elmah" preCondition="integratedMode">;
Note: In the configuration above, I’ve set the remote access property to true, allowing me to view the error log without having to log onto the server itself. This is quite handy in a hosted situation. If you do not need to enable remote access, set the value to false. You'll also want to add proper security to the log file so that random users cannot view the logs. You can get more details about securing you log file here.
Since we modified the path to our ELMAH handler and we're working with a MVC project, we need to also tell the MVC framework to ignore the specific route from being processed. Either in your App_Start handler within your Global.asax file or in the RouteConfig.cs file (depending on your project setup) add the following line:
routes.IgnoreRoute("Logs/elmah.axd/{\*pathInfo}");
That’s it! Compile your app again, deploy the files, and you’re ready to go!
Logging Your Application
Since Elmah is setup to grab any unhandled exception and log it, we simply need to generate one for testing. In my project, I created a simple Controller called "SampleController.cs" and added the following ActionResult method:
public ActionResult GenerateError() { // Nope, we're ending this party early. throw new Exception("Generate Error testing."); return View(); }
You shouldn't actually reach the view for this controller, but for good practice, make sure you create the appropriate View for this action as well. You can generate an error at this point by accessing the url: http://[YOUR_LOCAL_URL]/Sample/GenerateError
Viewing The Log
In order to view the log, you simply need to access the url http://[YOUR_LOCAL_URL]/Logs/elmah.axd. You’ll be greeted by a page similar to this:
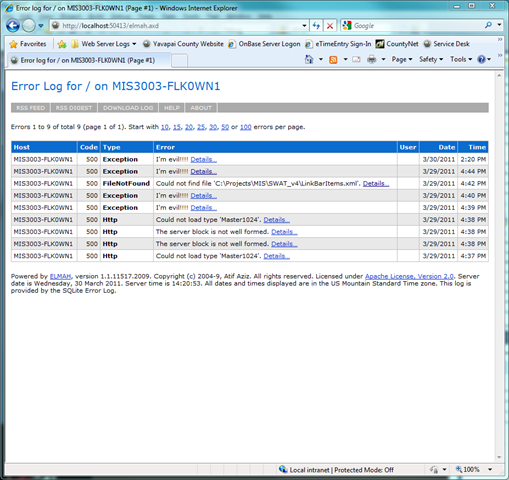
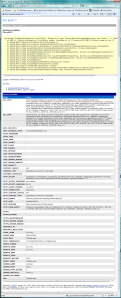
You can see how the basic details of the exceptions are displayed. Selecting the “Details” link displays a full dump of the exception in question:
From here you should have nearly everything you need to debug an issue with your site. Elmah also provides an RSS feed of recent exceptions and a way of downloading the entire log into a CSV file, if you need to work with it in other ways.
Final Thoughts
I’m really impressed with how easy Elmah is to get running and how detailed the error logs it produces. I’m doubly impressed with how easy it is to get things up and running thanks to Nuget. While Elmah doesn’t allow you to configure levels of logging (such as log4net) it does provide great ways to filter your exception logs and even e-mail the exceptions to you. I highly recommend it.