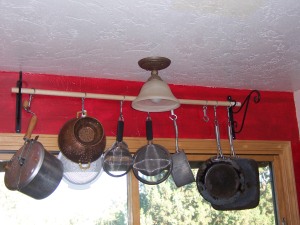
When Jen and I got our first house, we were excited to have a decent sized kitchen. However, we still didn't have that much cabinet space and we had a new set of pots and pans that needed a good home. We loved the idea of a pot rack but our kitchen was part of the vaulted ceiling for the house. For the life of us, we couldn't find a wall mountable pot rack [or one for a decent price].
So donning our thinking caps, we came up with a pot rack that is quite handy, super cheap, and ALSO gives you the chance to add some personal flair to it. So head out to your favorite home improvement store and take the following path:
&;nbsp;
Prep. Measure the length that you want the curtain rod. In both our kitchens so far, we've done it about a couple inches longer on both sides of the window in our kitchen. Mounting it high enough there allows for convenience without obstructing our nice view. You'll also want to get a feel for the size of the gap of your pots and pans that you're going to hang them on. You don't want the hook to be too thick so that they hang down, but too thin and they'll bend under the weight. You can always take a pot with you too. 8^D
1. Stop off in the bathroom department [What?! Trust me on this]. Pick up a package of shower curtain rings. You'll want the metal ones that don't open up for maximum safety. The last thing you need is a ring opening up and letting a big pot come crashing down in the middle of the night. Been there, done that. If you can't seem to find them with the bath stuff, you can also use curtain rings.
2. Now head off to the wood section. Typically there will be a section of wooden dowels. These are the long round rods that look like closet rods or curtain rods. You could technically use a closet rod, but it gets to be a little too thick in diameter. The main point is to find one the length you desire and that the rings can slide over and still leave a small gap for the hooks.
3. The third stop is the "fasteners" section. You're looking for S-Hooks. Yep, they look like an S. You'll hook one end to the rings and the other end to the pot. As mentioned above, get the hooks as thick as you can, but still allows for the pot to slide on and off easily. Sometimes you can have issues with the S-Hooks falling off the rings if the rack is a little too high up or you're you pull the pot off too fast. I went a little "over budget" the second time and picked up some hooks that had spring type clips on one side and an open hook on the other (see picture above) to make sure I didn't have this issue. They ran me $2 a piece, so if you're going for a cheaper route, start with S-Hooks and see how they handle for you. We got by just fine with our first pot rack.
4. Your final stop is gardening [What?! You talk the wacky again!]. What you're looking for here are two plant hangers. There are usually a handful of them that have some nice scroll design on them, which allows for the dowel to fit snugly into the scroll. This is another instance where you could use a closet rod hanger or even a curtain rod hanger. The important points are that you have a snug fit on the dowel so that it doesn't move when you put pots and pans off. Equally important is the ability to get some good sized screws into the wall to mount the hangers, so that they can support the load. If the hangars don't come with special inserts to reinforce the drywall, head back over to the "fasteners" section and find some.
Head on home and start assembling! All in all this should be pretty easy. For us, we mounted the plant hangers, slid the rings onto the dowel, and then inserted the dowel into the hangers. We put the S-Hooks onto the rings, and then hung the pots! Not counting my "super hooks" I purchased later, the entire project cost us about $20, maybe $25 tops.
The other nice thing, as mentioned before, is that you can add your own bling to the pot rack as you see fit. You can stain or paint the dowel in a color that goes with your kitchen. Or if the budget allows, you can swap out your dowel altogether for a curtain rod or shower curtain rod that is made of a strong iron or metal and has some fancy patterns on it. You want to make sure the rod doesn't bow at all when the pots are hung, otherwise that is a sign that there is too much weight and you risk that loud banging in the middle of the night scenario discussed above.
Enjoy! We've loved our pot rack and one day we might even bling it out a bit more. 8^D