With the newest release of ASP.Net 5 (vNext) and Entity Framework 7, it appears that the traditional web.config transform method and startup code will no longer work to have your database migration scripts automatically run when you deploy your code from source control to Azure. Here’s a new way that you can accomplish the same task and keep your continuous integration setup running smoothly.
In order for this solution to work, we modify the existing kudu deployment script and take advantage of the environment configuration that comes with the new framework.
1. Configure Environments
The first step is to add a new environment configuration for our deployment environment on Azure. We’re going to create a “Staging” environment in this case, since our app isn’t quite ready for production release yet. This staging configuration is going to have our updated datbase connection string, since default “Development/Local” configuration points to the machine database.
To do this, create a new file named appsettings.Staging.json and add the configuration section(s) that need updating:
{ "Data": { "MyConnection": "MY_STAGING_CONNECTION_STRING" } }
The way the new configuration model works is that the default appsettings.json file is loaded. Then if an environment variable is detected, it loads the corresponding environment file, named app settings.{Environment}.json, and overrides any default settings that are found. There are also options to have customized application startup code files as well with this new model.
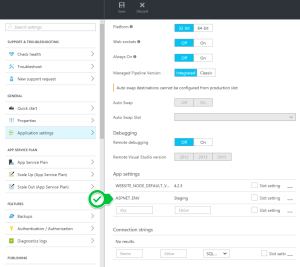
In order for our application deployment to use this configuration string (for deployments and for the web application), you’ll need to log into the Azure control panel, navigate to your application service, select “Application Settings” and add a new “App settings” entry with the following details
Name: ASPNET_ENV Value: Staging
Make sure to save the changes. Now whenever the web application is started, it will use yoru staging configuration for the database connection. Eventually you’ll want to do this for production as well.
2. Customize Your Deployment Script
When you first hook up your web application to your continuous integration repository, a deployment script is automatically created for you. This script will download all the appropriate DNX resources, restore dependencies, run the appropriate publishing commands, and then copy the deployment assets to the live site if everything is successful. Azure uses Kudu to fascilitate all of this. Fortunately, Kudu allows you to easily create your own deployment scripts to override the default one. As an added bonus. The Azure portal allows you to easy access your Kudu setings and scripts.
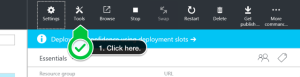
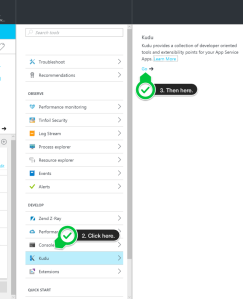
Go back to your Application Service section and click on the “Tools” button. Then select “Kudu” and click the “Go” link to launch the Kudo control panel:
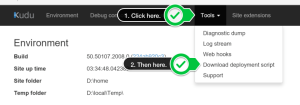
In the Kudu control panel, click on the “Tools” menu option and then select “Download Deployment Script”. This will send you a zip file with two files: .deployment and deploy.cmd. Save these files into the root of your repository, not necessarily your project root. If you don’t save them to the repository root, Kudu won’t detect them during the deployment and will use the defaults instead.
Open the deploy.cmd file in a text editor. Note: you may get a security warning about opening a .cmd file. You can trust this file and edit it.
Since we have already added our environment configuration variable through the portal, it is also exposed as an environment variable at the command line that runs for the deployment. When we run our “dnx ef database update” command, we can specify which environment to use for the process. However, since the deployment script itself runs in the repository root and not the project root, we’ll need to change to our project root directory in order for dnx to properly retrieve the necessary resources. Take a look at the deployment file. You’ll find somewhere in there is a “Run DNU Bundle section”. Notice how the command in here contains the path to our project.json file. We will want to use this path for our migration update command.
Right below the DNU Bundle command, we add another command to run the database migrations:
:: 5. Run EF Migration echo Running EF Migrations... echo Environment %ASPNET_ENV% call cd
In the code above, I’ve setup a lot of output so that I can properly track if something goes wrong. I add an echo statement so I can track when I’m starting the migration process of the script. I also echo the environment variable for ASPNET_ENV so I can track that the proper environment variable is being called. Finally I use the -v option on my database update command to get the output of it’s process, to help identify any issues if they come up.
I like running the EF migration before the Kudu Sync process, since that final step involves running all of the grunt scripts, which downloads node/bower modules and runs minification steps too (everything in your “prepublish” section of your project.json file).
3. Deploy Your Updates
Once this is in place, push the code to your repostitory and check out the results. Once the Azure deployment is complete, you should be able to look in the deployment log and see where the EF migration started, the environment it used, and when it completed. Check your staging database, all tables (or updates) should now be there.

Flexibility
I’ve seen a few other solutions about how to achieve the same result, but while there is a little bit of upfront work for this solution, it is a lot more flexible. By leveraging the ASPNET_ENV option, you can use the same deployment code on any range of environments, and only need to add the proper file/portal variable. The deployment script stays with your code repository, so there is no worry about “grabbing a fresh copy” of the deployment script in your next application instance. Unfortunately the path to the project root is hard coded, but that value should remain the same between your Test/Staging/Production deployments in Azure, and who knows, maybe there is a way to work on configuring that as well.
Finally, I like how this solution “de-couples” itself from the web portion of the deployment. Some initial attempts at this solution had the migration command in the “prepublish” section of the project.json file, but that was a “code smell” to me. Ideally we want to verify the database has updated before we even bother with the web code, and this allows us to do so elegantly.
Improvements?
Let me know if you try this out and if it works for you. If you have any improvements or suggestions, I’d love to hear them!
Enjoy!